Butterfly Braids: How I Learned to Achieve This Intricate and Eye-Catching Hairstyle
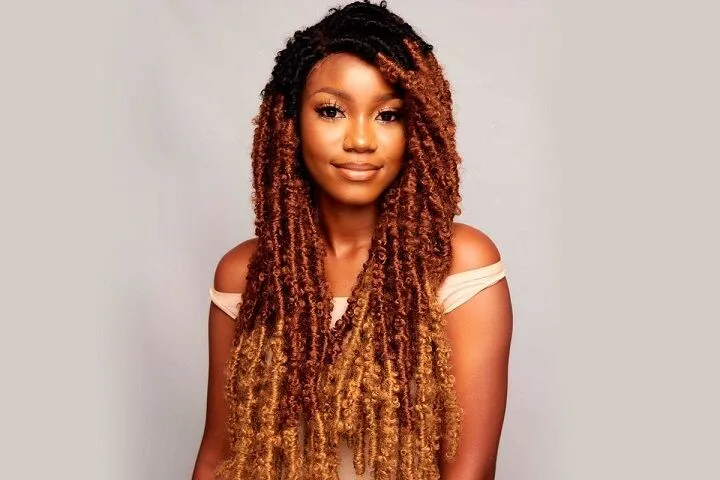
As a black woman, I’ve always loved experimenting with different hairstyles that allow me to embrace my natural hair texture while also having fun with braids, twists, and other protective styles. One of my absolute favorite discoveries over the past few years has been butterfly braids – they’re just so beautiful! The first time I saw photos of butterfly braids online, I was totally transfixed by the gorgeous, almost wing-like shape the braids create. I knew I had to try the style for myself.
I’ll never forget the reactions I got when I first stepped out with a fresh set of butterfly braids. My girls absolutely freaked out when they saw me, fawning over how pretty and unique the braids looked. I felt like a million bucks with those delicate, eye-catching braids fluttering around my shoulders whenever I turned my head. I was totally addicted after that first time!
In this article, I’ll walk you through everything I’ve learned about achieving butterfly braids for beginners. From picking the right hair and tools to mastering the intricate braiding techniques, I’ll share all my tips and tricks. The great thing about butterfly braids is they work on all hair lengths and textures, and allow you to add as much or as little length and fullness as you want. Trust me when I say these braids live up to their name – when done right, they look like delicate butterflies fluttering around your head!
Choosing the Right Hair
The first step in perfecting butterfly braids is picking the right hair. You want a texture that blends seamlessly with your natural hair and mimics its thickness and movement. For my hair, I prefer a softly waving kanekalon braiding hair that’s not silky straight but has some bend and curve to it. The specific type you choose depends on your hair texture and desired look. I suggest buying hair in a neutral brown or black shade so it blends with dark roots versus looking too shiny and fake. When buying hair, go for mid-range quality over the cheapest option – it will hold up better during braiding and last longer.
I once tried bargain braiding hair from the beauty supply store to save money – huge mistake! The cheap synthetic material frizzed up and tangled something awful while I was braiding. I could barely get the knots out enough to finish my braids, and they looked a hot mess within days. Now I know to splurge on the salon-quality brands for smooth, long-lasting braids.

Choosing the Right Tools
In addition to hair, you’ll need the right tools to achieve flawless butterfly locs hair. I suggest using a rat-tail comb for parting and dividing hair, duckbill clips for sectioning, edge control to smooth fly-aways, and small elastics to secure braids. I also keep single-prong curved braiding needles on hand to easily feed in hair extensions while braiding.
Make sure your rat-tail comb has a pointed tip for precise parts but is rounded on the sides so it doesn’t snag and rip out hair. Go for metal over plastic clips – I find they grip better and don’t pop off accidentally like plastic ones. Edge control and elastics are up to your preference, but look for gentle, moisturizing brands. For needles, I prefer the aluminum over plastic for smooth gliding.
The first time I tried using a plastic needle, I thought it would be more gentle than metal. But the tip was so dull it frayed and damaged the hair extensions as I wove them in. I tossed that cheap needle in the trash and haven’t looked back!

Mastering the Basic Butterfly Braiding Technique
Now for the fun part – actually braiding! I’m going to walk you through the basic steps so you can get the hang of this gorgeous style.
- Start with your first parted section and add hair extension to one side of it to triple the size.
- Cross the section over itself and begin a normal three-strand braid toward the scalp. Only braid an inch or two down to form the base.
- Once your base is formed, start curving the braid out and away from your head as you braid down a few more inches. Picture the end result – you want that wing shape, so begin fanning out early.
- When you have your desired angle, start adding in more hair extension evenly on both sides as you continue braiding down. This is what creates the fullness. Pay attention to how much hair you feed in on each side so braids look even.
- Once the braid is your desired length, secure the ends with an elastic and curl them under for a finished look.
- Move back up and start your next braid in the next section, angling it slightly behind the first. Repeat!
It definitely takes some practice, but once you get the motions down these come together surprisingly quickly. Don’t worry if your first few are messy or uneven – you’ll improve with each one. The key is keeping sections small and taking care to only add in a little hair at a time for that tapered look.
I remember on my first try, my braids came out all raggedy and uneven. Some zig-zagged crazily away from my scalp because I didn’t fan them out smoothly! But after a few more practice runs, I got better at creating that gorgeous butterfly shape. Now I can knock out a whole head of braids in under two hours.
Adding Length, Volume, and Style
The wonderful thing about butterfly braids is you can customize them to your liking. If you want extra drama, try using two packs of hair per braid instead of one. This creates gorgeous doubled-up braids with serious thickness and length.
You can also play with braid size – some of my favorite styles combine thinner braids in the front with chunkier, more voluminous ones in the back. Add beads or gold cuffs to the ends for jewelry-like accents.
For my last birthday I treated myself to jumbo butterfly braids that went all the way down my back. I felt like a glamorous mermaid with those long, full braids swinging behind me! I added chunky gold beads at the ends for an extra flashy touch.
When you get tired of the standard look, reinvent butterfly braids by braiding down into a bun, updo, ponytail, or pigtails. For an edgy style, shave one or both sides of your head and sweep braids over for an asymmetric look. The styling possibilities are endless! You could also experiment with long butterfly locs, knotless braids, or a braided wig for fun variation.

Maintenance Tips and Upkeep
Like any protective style, butterfly braids require some TLC to look fresh. Be gentle when washing and conditioning braids – work a moisturizing shampoo through the extensions versus vigorously scrubbing to prevent tangling. Rinse braids thoroughly and apply a leave-in conditioner down the length to keep hair soft and detangled.
I also recommend covering braids with a scarf or bonnet at night. This prevents rubbing against pillows which can lead to frizz over time.
For styling, lightly mist braids with water or a mix of leave-in conditioner and water to bring life back to the hair. Let air dry or diffuse on low heat. You can also gently curl the ends under with a flat iron or flexi rod rollers.
I like to get my braids redone every 6-8 weeks as the natural hair grows out. Regularly trimming the braid bases helps reduce frizz and maintains the clean parts. It’s important not to leave braids in too long once the natural hair passes the length of the extensions or they’ll start matting.
Remove braids gently using a detangling spray or conditioner to work out knots. Never rip out! Plan for a deep conditioning treatment after taking braids down to restore moisture and strengthen hair.
Elevate Your Style with Braided Wigs: Effortless Elegance
For those seeking the allure of braids without the commitment, braided wigs are a game-changer. These versatile pieces allow you to instantly transform your look with a variety of braided styles, all while keeping your natural hair protected. Braided wigs provide the best of both worlds – the artistry of braided hairstyles without the time-consuming effort of styling and upkeep. Whether you’re exploring intricate butterfly braids, bold knotless braids, or any other braided style, these wigs offer a quick and convenient way to experiment with your appearance. With FANCIVIVI’s dedication to creating high-quality, natural-looking braided wigs, you can confidently rock a stunning braided hairstyle, knowing that your hair remains safe and healthy beneath. So, if you’re looking to effortlessly switch up your style and give your natural hair a break, consider the elegance and convenience of braided wigs for your next fashion statement.
As I continue my personal hair journey figuring out which protective styles best complement my natural locks, I’m always on the lookout for high-quality braided wigs that deliver both style and comfort. In my research, I came across the brand FANCIVIVI, which specializes in braided wigs designed specifically for black women. What interests me about FANCIVIVI is their focus on celebrating black hair in all its versatile glory. Their wigs are designed to make statement-making, protective styles accessible for everyday wear. As a busy career woman, I appreciate that FANCIVIVI allows me to easily switch up my look without the maintenance required for real braids.